Connecting the jumper cables

Note: In the illustration, the vehicle on the bottom is used to designate the assisting (boosting) battery.
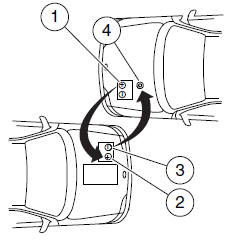
1. Connect the positive (+) jumper cable to the positive (+) terminal of the discharged battery.
2. Connect the other end of the positive (+) cable to the positive (+) terminal of the assisting battery.
3. Connect the negative (-) cable to the negative (-) terminal of the assisting battery.
4. Make the final connection of the negative (-) cable to an exposed metal part of the stalled vehicle’s engine, away from the battery and the carburetor/fuel injection system.
Note: Do not attach the negative (-) cable to fuel lines, engine rocker covers, the intake manifold or electrical components as grounding points.
WARNING: Do not connect the end of the second cable to the negative (-) terminal of the battery to be jumped. A spark may cause an explosion of the gases that surround the battery.
Ensure that the cables are clear of fan blades, belts, moving parts of both engines, or any fuel delivery system parts.
See also:
Running out of fuel
Avoid running out of fuel because this situation may have an adverse
effect on powertrain components.
If you have run out of fuel:
• You may need to cycle the ignition from off to on several t ...
Create a MyKey
To program MyKey on one of the keys programmed to the vehicle, put
the intelligent access key in the backup slot with brand logo facing up;
refer to Starting in the Driving chapter for the locatio ...
RDS Radio
Available only in FM mode. This feature allows you to search
RDS-equipped stations for a certain category of music format: CLASSIC,
COUNTRY, JAZZ/RB, ROCK, etc.
To activate: Press MENU repeatedly ...