Adjustable head restraints

Your vehicle is equipped with front row outboard head restraints that are vertically adjustable.
WARNING: To minimize the risk of neck injury in the event of a crash, the driver and passenger occupants should not sit in and/or operate the vehicle, until the head restraint is placed in its proper position. The driver should never adjust the head restraint while the vehicle is in motion.
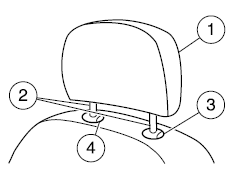
The adjustable head restraints consist of:
• a trimmed energy absorbing foam
and structure (1),
• two steel stems (2),
• a guide sleeve adjust/release
button (3),
• and a guide sleeve unlock/remove
button (4).
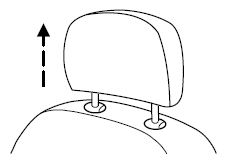
To adjust the head restraint, do the following:
1. Adjust the seatback to an upright driving/riding position.
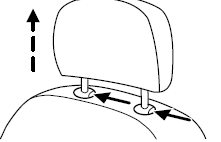
2. Raise the head restraint by
pulling up on the head restraint.
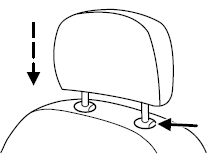
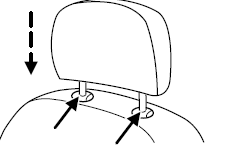
3. Lower the head restraint by pressing and holding the guide sleeve adjust/release button and pushing down on the head restraint.
Properly adjust the head restraint so that the top of the head restraint is even with the top of your head and positioned as close as possible to the back of your head. For occupants of extremely tall stature, adjust the head restraint to its full up position.
WARNING: The adjustable head restraint is a safety device.
Whenever possible it should be installed and properly adjusted when the seat is occupied.
To remove the adjustable head restraint, do the following:
1. Pull up the head restraint until it reaches the highest adjustment position.
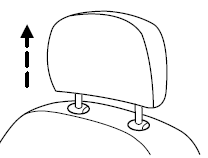
2. Simultaneously press and hold both the adjust/release button and the unlock/remove button, then pull up on the head restraint.
To reinstall the adjustable head restraint, do the following:
1. Insert the two stems into the
guide sleeve collars.
2. Push the head restraint down
until it locks.
Properly adjust the head restraint so that the top of the head restraint is even with the top of your head and positioned as close as possible to the back of your head. For occupants of extremely tall stature, adjust the head restraint to its full up position.
WARNING: To minimize the risk of neck injury in the event of a crash, head restraints must be installed properly.
Tilting head restraints (if equipped)
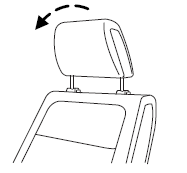
The front head restraints may have a tilting feature for extra comfort. To tilt the head restraint, do the following:
1. Adjust the seatback to an upright driving/riding position.
2. Pivot the head restraint forward
towards your head to the desired
location.
After the head restraint reaches the forward-most tilt position, pivoting it forward again will then release it to the rearward un-tilted position.
See also:
Cargo area features
Cargo net (if equipped)
The cargo net secures lightweight
objects in the cargo area. Attach the
net to the anchors provided. Do not
put more than 50 lb (22 kg) in the
net.
WARNING: The car ...
Additional information contained on the tire sidewall for “LT” typetires
“LT” type tires have some additional
information beyond those of “P”
type tires; these differences are
described below.
Note: Tire Quality Grades do not
apply to this type of tire.
1. LT ...
Positive retention floor mat
WARNING: Always use
floor mats that are designed
to fit the foot well of your vehicle.
Only use floor mats that leave the
pedal area unobstructed. Only use
floor mats that are firmly secu ...