
Removing the jumper cables

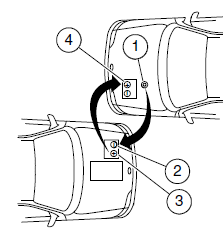
Remove the jumper cables in the reverse order that they were connected.
Note: In the illustration, the vehicle on the bottom is used to designate the assisting (boosting) battery.
1. Remove the jumper cable from
the ground metal surface.
2. Remove the jumper cable on the
negative (-) terminal of the booster
vehicle’s battery.
3. Remove the jumper cable from
the positive (+) terminal of the
booster vehicle’s battery.
4. Remove the jumper cable from
the positive (+) terminal of the
disabled vehicle’s battery.
After the disabled vehicle has been started and the jumper cables removed, allow it to idle for several minutes so the engine computer can relearn its idle conditions.
See also:
Memory feature (if equipped)
This system allows automatic
positioning of the driver seat, power
mirrors and power tilt/telescopic
steering column (if equipped) to
two programmable positions.
The memory seat control is ...
Trailer towing tips
• Practice turning, stopping and backing-up before starting on a trip to
get the feel of the vehicle-trailer combination. When turning, make
wider turns so the trailer wheels will clear curbs and ...
Overhead console
The appearance of your vehicle’s overhead console will vary according to
your option package.
Storage compartment
Press on the rear edge of the
compartment door to open.
The storage compart ...