
Removing the jumper cables

Remove the jumper cables in the reverse order that they were connected.
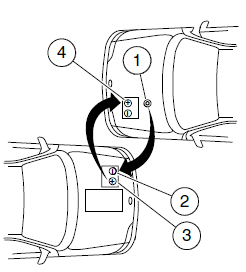
Note: In the illustration, the vehicle on the bottom is used to designate the assisting (boosting) battery.
1. Remove the jumper cable from
the ground metal surface.
2. Remove the jumper cable on the
negative (-) terminal of the booster
vehicle’s battery.
3. Remove the jumper cable from
the positive (+) terminal of the
booster vehicle’s battery.
4. Remove the jumper cable from
the positive (+) terminal of the
disabled vehicle’s battery.
After the disabled vehicle has been started and the jumper cables removed, allow it to idle for several minutes so the engine computer can relearn its idle conditions.
See also:
Why maintain your vehicle?
This guide describes the scheduled maintenance required for your
vehicle. Carefully following this schedule helps protect against major
repair expenses resulting from neglect or inadequate mainten ...
Exterior & Styling
What you see on the MKX's exterior is what you get. The only real change is
from standard 18-inch alloy wheels to chrome versions, also 18 inches, when you
get the Special Package.
It's difficul ...
More standard luxury
The 2011 Lincoln MKZ Hybrid comes standard with features and technologies
that are either not offered on the Lexus HS 250h or are available only at an
extra cost. They include:
SmartGauge with E ...