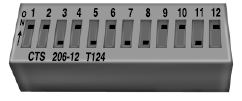
Fixed code programming

Note: It may be helpful to have another person assist you in programming the transmitter.

To program units with fixed code DIP switches, you will need the garage door hand-held transmitter, paper and a pen or pencil.
1. Switch the ignition on.
2. Open the battery cover and note all the switch settings from left to right.
When the switch is in the up, on, or + position, mark down “left button”.
When the switch is in the middle, neutral, or 0 position, mark down “middle button”.
When the switch is in the down, off, or – position, mark down “right button”.

3. Press all three function buttons simultaneously for a few seconds and then release. The LED lamps will flash slowly.
Note: The following step must be completed within 2.5 minutes.
4. Enter the corresponding DIP switch settings from left to right into the system by pressing and releasing the buttons corresponding to the settings you noted.
5. Simultaneously press and release all three function buttons. The LED lamps will illuminate.

6. Press and hold the function button you would like to use to control the garage door.
Note: You may need to hold the button from 5–55 seconds before observing movement of the garage door.
7. When the garage door moves, release the button within one second.
When the button is released, the LED lamp will flash slowly.
8. The LED lamp will begin to flash rapidly until programming is complete. If your garage door does not operate, repeat the previous steps. Otherwise, call the toll-free help line on 1-866-572-2728.
The LED lamp above the selected button will illuminate to confirm that the system is responding to the button command.
See also:
Attaching tether straps
Many forward-facing child safety seats include a tether strap which
extends from the back of the child safety seat and hooks to an anchoring
point called the top tether anchor. Tether straps are ...
Aiming the headlamps
The headlamps on your vehicle are properly aimed at the assembly plant.
If your vehicle has been in an accident the alignment of your headlamps
should be checked by your authorized dealer.
Verti ...
Driving through water
If driving through deep or standing
water is unavoidable, proceed very
slowly. Never drive through water
that is higher than the bottom of
the wheel rims (for cars) or the
bottom of the hu ...
