Center head restraint

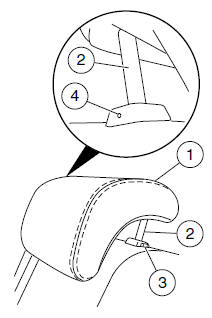
The center head restraint consists
of:
• a trimmed energy absorbing foam and structure (1),
• two steel stems (2),
• a guide sleeve adjust/release button (3),
• and a guide sleeve with a pin hole for removing the head restraint (4).
To adjust the head restraint, do the following:
1. Raise the head restraint by pulling up on the head restraint.
2. Lower the head restraint by pressing and holding the guide sleeve adjust/release button and pushing down on the head restraint.
Properly adjust the head restraint so that the top of the head restraint is even with the top of your head and positioned as close as possible to the back of your head. For occupants of extremely tall stature, adjust the head restraint to its full up position.
WARNING: The adjustable head restraint is a safety device.
Whenever possible it should be installed and properly adjusted
when the seat is occupied.
To remove the center head restraint, do the following:
1. Pull up the head restraint until it reaches the highest adjustment position.
2. Insert and push a tool, such as a large paper clip, into the pin hole located on the side of the guide sleeve and press the adjust/release button, then pull the head restraint upward.
3. Store the head restraint in a secure location, such as the trunk of the vehicle.
To reinstall the center head restraint, do the following:
1. Insert the two stems into the guide sleeve collars.
2. Push the head restraint down until it locks.
Properly adjust the head restraint so that the top of the head restraint is even with the top of your head and positioned as close as possible to the back of your head. For occupants of extremely tall stature, adjust the head restraint to its full up position.
WARNING: To minimize the risk of neck injury in the event of a crash, head restraints must be installed properly.
See also:
Adjusting the front power seat
WARNING: Never adjust the driver’s seat or seatback when the
vehicle is moving.
WARNING: Do not pile cargo higher than the seatbacks to
reduce the risk of injury in a collision or sudden stop.
W ...
Second generation (2003–2006)
The Navigator was updated in 2003, along with the Ford Expedition, on the new
Ford U platform. The interior was also substantially revised to bring it up to
the level expected by luxury buyers. So ...
Cell phone use
The use of mobile communications equipment has become increasingly
important in the conduct of business and personal affairs. However,
drivers must not compromise their own or others’ safety when ...