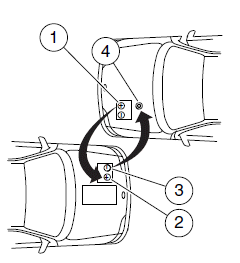
Connecting the jumper cables
Note: In the illustration, the vehicle on the bottom is used to designate the assisting (boosting) battery.
1. Connect the positive (+) jumper
cable to the positive (+) terminal of
the discharged battery.
2. Connect the other end of the
positive (+) cable to the positive
(+) terminal of the assisting battery.
3. Connect the negative (-) cable to
the negative (-) terminal of the
assisting battery.
4. Make the final connection of the
negative (-) cable to an exposed
metal part of the stalled vehicle’s
engine, away from the battery and
the carburetor/fuel injection system.
Note: Do not attach the negative (-) cable to fuel lines, engine rocker covers, the intake manifold or electrical components as grounding points.
WARNING: Do not connect the end of the second cable to the negative (-) terminal of the battery to be jumped. A spark may cause an explosion of the gases that surround the battery.
Ensure that the cables are clear of fan blades, belts, moving parts of both engines, or any fuel delivery system parts.
See also:
Reporting safety defects (Canada only)
If you believe that your vehicle has a defect which could cause a crash or
could cause injury or death, you should immediately inform Transport
Canada, using their toll-free number: 1–800–333–0510 ...
Keyless entry keypad procedure
1. Turn the ignition to the off
position.
2. Close all the doors.
3. Enter factory–set 5–digit entry
code.
4. Press and hold the 3 • 4. While holding the 3 • 4, press and release
the 7 • ...
Remote start climate operation (if equipped)
The climate control system will condition the cabin temperature during
remote start. Engine idle may increase to help with adjusting the cabin
temperature.
Note: No climate control adjustments ...