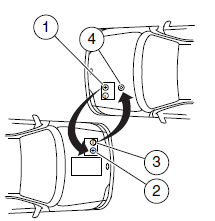
Connecting the jumper cables

Note: In the illustration, the vehicle on the bottom is used to designate the assisting (boosting) battery.
1. Connect the positive (+) jumper
cable to the positive (+) terminal of
the discharged battery.
2. Connect the other end of the
positive (+) cable to the positive
(+) terminal of the assisting battery.
3. Connect the negative (-) cable to
the negative (-) terminal of the
assisting battery.
4. Make the final connection of the
negative (-) cable to an exposed
metal part of the stalled vehicle’s
engine, away from the battery and
the carburetor/fuel injection system.
Note: Do not attach the negative (-) cable to fuel lines, engine rocker covers, the intake manifold or electrical components as grounding points.
WARNING: Do not connect the end of the second cable to the negative (-) terminal of the battery to be jumped. A spark may cause an explosion of the gases that surround the battery.
Ensure that the cables are clear of fan blades, belts, moving parts of both engines, or any fuel delivery system parts.
See also:
INTERIOR
The MKT has plenty of luxury features, but there were so many that I felt
like I had feature fatigue. I got tired of struggling with them. The first
feature to confound me was the driver's seat th ...
Personal safety system™
The Personal Safety System provides an improved overall level of frontal
crash protection to front seat occupants and is designed to help further
reduce the risk of airbag-related injuries. The sy ...
Power distribution box
The power distribution box is located in the engine compartment. The
power distribution box contains high-current fuses that protect your
vehicle’s main electrical systems from overloads.
WARNING ...