Connecting the jumper cables

Note: In the illustration, the vehicle on the bottom is used to designate the assisting (boosting) battery.
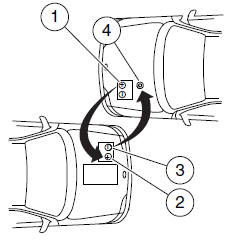
1. Connect the positive (+) jumper cable to the positive (+) terminal of the discharged battery.
2. Connect the other end of the positive (+) cable to the positive (+) terminal of the assisting battery.
3. Connect the negative (-) cable to the negative (-) terminal of the assisting battery.
4. Make the final connection of the negative (-) cable to an exposed metal part of the stalled vehicle’s engine, away from the battery and the carburetor/fuel injection system.
Note: Do not attach the negative (-) cable to fuel lines, engine rocker covers, the intake manifold or electrical components as grounding points.
WARNING: Do not connect the end of the second cable to the negative (-) terminal of the battery to be jumped. A spark may cause an explosion of the gases that surround the battery.
Ensure that the cables are clear of fan blades, belts, moving parts of both engines, or any fuel delivery system parts.
See also:
Sound Adjustments
Press SOUND repeatedly to cycle through the following features:
BASS: Press
SEEK
to adjust the level of bass.
TREBLE: Press
SEEK
to adjust the level of treble.
BALANCE: Press
SE ...
Information on “P” type tires
P215/65R15 95H is an example of a
tire size, load index and speed
rating. The definitions of these
items are listed below. (Note that
the tire size, load index and speed
rating for your vehi ...
Notice to crossover vehicle owners
Crossover vehicles handle differently
than passenger cars in the various
driving conditions that are
encountered on streets, highways
and off-road. Crossover vehicles are
not designed for co ...