Aiming the headlamps

The headlamps on your vehicle are properly aimed at the assembly plant.
If your vehicle has been in an accident the alignment of your headlamps should be checked by your authorized dealer.
Vertical aim adjustment
1. Park the vehicle directly in front of a wall or screen on a level surface, approximately 25 feet (7.6 meters) away.
• (1) 8 feet (2.4 meters)
• (2) Center height of lamp to
ground
• (3) 25 feet (7.6 meters)
• (4) Horizontal reference line
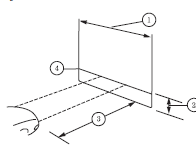
2. Measure the height of the
headlamp bulb center from the
ground and mark an 8 foot
(2.4 meter) horizontal reference line
on the vertical wall or screen at this
height.
3. Turn on the low beam headlamps to illuminate the wall or screen and
open the hood.
To see a clearer light pattern for adjusting, you may want to block the light from one headlamp while adjusting the other.
For vehicles with halogen headlamps:
On the wall or screen you will observe a flat zone of high intensity light located at the top of the right hand portion of the beam pattern. If the top edge of the high intensity light zone is not at the horizontal reference line, the headlamp will need to be adjusted.

For vehicles with HID headlamps:
There is a distinct cut-off (change from light to dark) in the left portion of the beam pattern. The top edge of this cut-off should be positioned 2 inches (5 cm) below the horizontal reference line.
4. Locate the vertical adjuster on each headlamp. Using an Allen wrench or Phillips #2 screwdriver, turn the adjuster either clockwise (to adjust down) or counterclockwise (to adjust up).
The horizontal edge of the brighter light should touch the horizontal reference line.
5. Close the hood and turn off the lamps.
HORIZONTAL AIM IS NOT REQUIRED FOR THIS VEHICLE AND IS NON-ADJUSTABLE.
See also:
Power side view mirrors
WARNING: Do not adjust the mirror while the vehicle is in
motion.
To adjust your mirrors:
1. Rotate the control clockwise to
adjust the right mirror and rotate
the control counterclockwise t ...
Coolant refill capacity
To find out how much fluid your vehicle’s cooling system can hold, refer
to Maintenance product specifications and capacities in this chapter.
Fill your engine coolant reservoir as outlined previou ...
Changing tires with a TPMS
Each road tire is equipped with
a tire pressure sensor located
inside the tire/wheel cavity. The
pressure sensor is attached to
the valve stem. The pressure
sensor is covered by the tire and ...