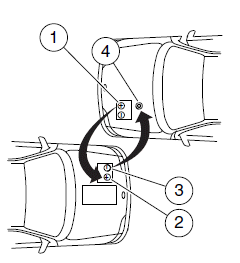
Connecting the jumper cables
Note: In the illustration, the vehicle on the bottom is used to designate the assisting (boosting) battery.
1. Connect the positive (+) jumper
cable to the positive (+) terminal of
the discharged battery.
2. Connect the other end of the
positive (+) cable to the positive
(+) terminal of the assisting battery.
3. Connect the negative (-) cable to
the negative (-) terminal of the
assisting battery.
4. Make the final connection of the
negative (-) cable to an exposed
metal part of the stalled vehicle’s
engine, away from the battery and
the carburetor/fuel injection system.
Note: Do not attach the negative (-) cable to fuel lines, engine rocker covers, the intake manifold or electrical components as grounding points.
WARNING: Do not connect the end of the second cable to the negative (-) terminal of the battery to be jumped. A spark may cause an explosion of the gases that surround the battery.
Ensure that the cables are clear of fan blades, belts, moving parts of both engines, or any fuel delivery system parts.
See also:
All-wheen drive
All-wheel drive is standard with the twin-turbo 3.5-liter V6 and optional on
the 3.7-liter V6. In good weather, over smooth roads at modest speeds and when
AWD is not needed, the system intelligentl ...
Changing tires with a TPMS
Each road tire is equipped with
a tire pressure sensor located
inside the tire/wheel cavity. The
pressure sensor is attached to
the valve stem. The pressure
sensor is covered by the tire and ...
Octane recommendations
“Regular” unleaded gasoline with a
pump (R+M)/2 octane rating of 87 is
recommended. Some stations offer
fuels posted as “Regular” with an
octane rating below 87, particularly
in high altitud ...